
Surprising fact: more than half of iPhone users personalize chats with at least one custom sticker, and I joined them after discovering a tiny trick in the Photos app that saves time and sparks creativity.
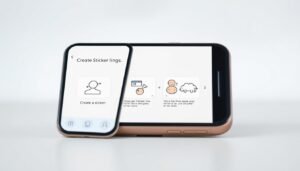
I show exactly what I tap on the screen to turn any favorite photo into a polished sticker right from Photos. With a long press on a subject, I tap Add Sticker and the cutout saves to my sticker menu for quick use in Messages and Markup.
I explain the difference between static and animated stickers, and how Live Photos become playful moving images. I also highlight simple effects like Outline, Comic, and Puffy that add personality without extra apps.
My collection syncs via iCloud across my devices, so favorites follow me to iPad, Mac, and Vision Pro. I’ll cover basic management too — removing a sticker, keeping the menu tidy, and picking photos that yield clean cutouts first try.
Key Takeaways
- I can create a sticker directly from Photos by long-pressing a subject and tapping Add Sticker.
- Live Photos can become animated stickers; effects like Outline and Puffy add flair.
- Stickers save to a menu accessible from the keyboard and Markup in supported apps.
- iCloud sync keeps my sticker set available across all signed-in devices.
- Deleting unwanted items and choosing clear images helps keep the menu neat.
What I Need to Know Before I Start Making iPhone Stickers
Knowing the limits and strengths of the current Photos and Messages tools saves time. I’ll set a quick expectation so I don’t chase extra apps. The core workflow lives inside the Photos app and the Messages app.
Key built-in features:
- I create a sticker by long-pressing the subject in a photo or a live photo and tapping Add Sticker.
- Live photos can become animated stickers, or I can pick a still from the same shot.
- The Add Effect options—Outline, Comic, Puffy—let me change a sticker’s vibe fast.
- My collection appears in a central sticker drawer tied to the keyboard and Markup menu.
I choose clear subjects so the automatic cutout needs less cleanup. Small icon cues and menu prompts show exactly where each option lives.
Stickers sync via iCloud and work across apps that support Markup and the messages app. I can delete any sticker from the Add Sticker list if I want a tidier menu.
How to Make Stickers on iPhone

I walk through the quick taps and presses that turn any photo into a ready-to-send sticker. I start in the Photos app and use small gestures so the process stays fast and repeatable.
Create a sticker from Photos
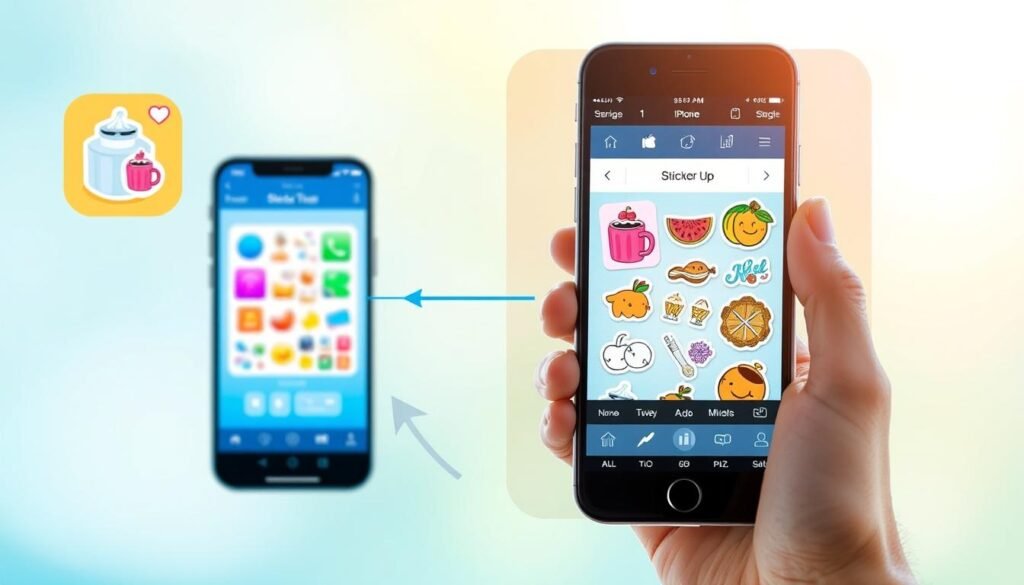
I open a photo full screen, touch and hold the subject until it lifts, then release and use the pop-up menu to Add Sticker. The sticker saves in my keyboard and the sticker drawer for quick reuse.
Animated stickers from a Live Photo
When I start from a Live Photo, the short motion becomes an animated sticker automatically. I can toggle the live effect off later if I want a still image instead.
Create inside Messages
I open a conversation, tap the emoji icon, then the stickers icon, hit the + icon, pick a photo, and tap Add Sticker. It’s handy when I’m already typing.
Pro tips for cleaner edges
- I crop or zoom into the subject before creating a sticker to help automatic detection.
- I tap Add Effect (Outline, Comic, Puffy) after saving for instant style.
- I check the sticker drawer so I don’t recreate an image I already added.
“A tight crop and good light cut the background noise and make my stickers look sharper.”
| Action | Where | Benefit |
|---|---|---|
| Long-press subject | Photos app | Quick cutout and pop-up menu with Add Sticker |
| Use Live Photo | Photos app | Creates an animated sticker loop |
| Add from Messages | Messages app | Create while chatting; saves to sticker drawer |
| Crop before saving | Photos app / Edit | Cleaner edges and better subject isolation |
For an extended walkthrough and extra tips, I also reference this concise guide: step-by-step sticker tips.
Customize, Use, and Manage My Stickers Across Apps and Devices

I like to give each sticker a little personality using the Add Effect choices in the drawer. I tap an effect right after saving and try Outline, Comic, Puffy, or Shiny until it reads well on a small screen.
Add effects and edit later
I can change an effect any time by opening the sticker drawer, long-pressing a sticker, and choosing Add Effect or Edit Effect. This lets me test contrast with Outline or add depth with Puffy.
Send, place, and drag in Messages
In Messages, I tap the emoji icon, open Stickers, then pick one to drop in the text box. I also long-press and drag a sticker onto a specific message bubble for a visual reply on supported versions.
Use Markup tools across apps
I add stickers inside photos and notes via Markup tools. The sticker becomes a decorative label or overlay that I can move, resize, or attach to a text box.
Organize, delete, and sync
I keep a tidy menu by opening the drawer, long-pressing to Rearrange, and dragging favorites up. To remove an item I long-press and pick Delete. All my stickers sync via iCloud so they show up on my iPad and Mac without rebuilding them.
“I tune effects quickly, then rearrange the drawer so the sticker I want is one tap away.”
| Action | Where | Why it helps |
|---|---|---|
| Add Effect | Sticker drawer | Fast visual styles: Outline, Comic, Puffy, Shiny |
| Drag onto bubble | Messages | Pin a sticker to a specific message for context |
| Use Markup | Photos / Notes | Decorate images and documents across apps |
| Rearrange / Delete | Sticker drawer | Keep the drawer focused on what I want |
Conclusion
My final note: the whole workflow lives in the Photos app and the Messages app, so I don’t need extra software. A tap-and-hold lifts a subject, and the pop-up menu gives the Add Sticker option in one quick move.
I pick a clear subject photo or crop a busy subject photo first. That small step helps edges and hair separate from the background for a cleaner cutout.
I then choose an effect that fits the moment — maybe Outline for contrast or Puffy for depth. Effects are flexible, so I can swap styles later from the drawer.
To send, I tap the icon, open the sticker drawer, drop a sticker into the text box or drag it onto a message, and press the send button. I use markup tools to place images and labels inside photos and notes.
Finally, I keep favorites near the top of the drawer and rely on iCloud sync so my collection follows me across any device I sign into. Repeat the simple checklist — pick a strong photo, lift the subject, Add Sticker, pick an effect, then tap sticker — and it becomes second nature.